2. Click the Download link:

3. Choose Mirror 8:

4. When the download finishes, run the setup program. If any UAC notices come up, say Yes. Leave all options at their default settings.
5. If you want to, you can set ImgBurn to check for any updates:

Now that ImgBurn is open, you need to decide how you want to make the ISO image.
- Is your release on a CD or DVD? Choose the "Create image file from disc" option.
- Is your release a bunch of files and not on a CD or DVD? Choose the "Create image file from files/folders".
Making an ISO image from CD or DVD
6.1. Click the "Create image file from disc" option:

6.2. Open your CD drive and put the disc in:

No, no, no! That's the wrong way. Put the disc in label side up:
There you go, now close the tray.
6.3 When the Autoplay dialog comes up, look at the dialog. In my case, it says "CD-RW Drive (D:): DISKA". Take a note of the drive letter, you will need this later.

Note: The Autoplay dialog may not come up on some Windows installations such as Windows Server. In these cases, go to My Computer and take a look at the CD Drives.
6.3 Now that we know what drive has the disc we want to rip, we need to set it in ImgBurn. In my case, ImgBurn updated itself when I put my disc in. If this is not your case, change the "Source" dropdown box to match the drive you put your disc in:

6.4 Click the button at the bottom:
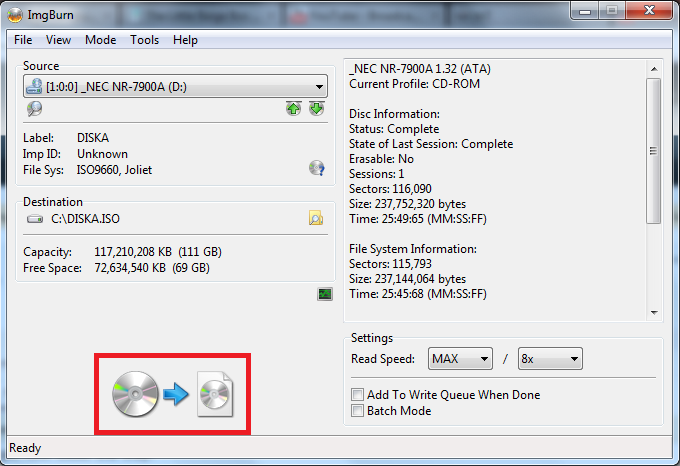
6.5 ImgBurn will play a cheery tone if the rip succeeded. The next step is to make an MD5 hash of the ISO file. If you don't, your release will be rejected as mrpijey will have no way of checking if the image is good or bad. First though, let's show how to make an ISO image out of a bunch of files.
Making an ISO image from files
So, you found something that we don't have but you don't have an ISO image of it. What do you do? mrpijey will reject it so you can't upload as-is. You'll have to make your own ISO image from those files.
7.1 Click "Create image file from files/folders":

7.2 Click the folder icon:

Select which folder has the files you want. Do not select "My Documents" as the folder, only the folder containing the files you want to upload.
7.3 In the "Destination" box, type in something like "C:\WIN95.ISO" or click the folder icon next to the box to browse where you want the ISO image to go. Put it anywhere you like, but be sure to call it by the product name and have .ISO at the end!
7.4 Click the button at the bottom:

7.5 If it comes up with any messages about only one folder and no image label, click Yes and wait for the image to be made.
Compression and checksumming
Now that your ISO image has been created, you are required to give an MD5 checksum and compress it. Do the MD5 checksum first.
8. Get a tool to make MD5 hashes. There are plenty of MD5 checksum tools out there. I prefer MD5SUMS but a command line may not be for everyone. Have a look on the BetaArchive FTP server in /(Tools)/Checksumming.
9. Save the MD5 hash! If you have just one ISO image, copy the MD5 hash into your text editor and save it next to your ISO image. If you are uploading a multi-disc set, you'll need to do something like this with the MD5 hashes:
Code: Select all
DISCA.ISO <md5>
DISCB.ISO <md5>
DISCC.ISO <md5>
10. Compression! If you don't compress your release, it will be rejected. You need to compress the files in a RAR, 7z or ZIP archive.
Make sure that your ISO image and MD5 hash file are in the same archive.
When you go to name the archive, call it something in plain English, like "Microsoft Windows 95 (OSR2)" and not "WIN95OSR2".
Setting up FileZilla to upload files
Now that you've got your archive made, you have to upload it.
11.1 In FileZilla, open up the Site Manager. Create a new site and call it "Uploads" or something like that.
11.2 Go to http://www.betaarchive.com/forum/servers.php and click the "Upload Servers" tab.
11.3 Put these items in the "Upload" settings:

Don't forget to change the encryption to "Require implicit FTP over TLS".
Upload your file
Now that you've got your ISO made, checksummed, compressed and FileZilla set up, you have to upload it.
12. Connect to the BA Upload server.
13. Right-click in any white space in the remote server file list and choose the "Create Directory" option.
14. Call it "From <username>". If you have multiple files you want to upload over several days, call it "From <username> (Uploading)"
15. Go into your newly created directory and upload your file!
16. When the file is uploaded, create a new file or directory called "Finished". It used to be possible to rename your uploading directory but now it isn't possible.
17. Wait for mrpijey to check all the releases.
FAQ (Frequently asked questions)
ImgBurn failed!
- Bad or severely scratched disc? Bad CD drive? You'll have to do a little checking on your own.
- That speed is your download speed. Your upload speed is a good bit slower than the download speed. If it takes forever during the day, upload during the night. It may not be any faster but it you will be in bed while it's uploading and it should be done by the time you wake up. If not, you either have dial-up or you wake up really early in the morning.
- If all the other "From <username>" directories are missing, then mrpijey has taken your file and has put it in his processing queue.
- mrpijey may not have gotten to processing your file yet. If you don't see your file after a few FTP Release updates, then your archive may not have been compliant with the upload rules, or it corrupted during the upload.
- For your own safety.