Making a contribution and getting archive access
01. Introduction
02. Prerequisites
03. Accepted software
04. Where to find software
05. Dumping the software
- DiscImageCreator (DIC)
- Alcohol 120%
06. Scanning media/art/docs
07. Naming your upload
08. Preparing your upload
09. Uploading your file
10. Applying for access
11. Application processing
1. Introduction
BetaArchive is a contribution based website which means that to gain access to our archive you must contribute something original of quality, and in a format that properly preserves all of the associated data from the original media, to the release artwork and documentation.
We believe this is the fairest way for users to gain access, and it helps to keep our cause alive.
This might sound like a daunting and unachieveable task, but it's really not! It is going to take you some time and effort, but the reward will be worth it.
This page will help to guide you through the process step by step and provide you with the needed guides to do it.
Failure to follow this guide and following all of its steps will result in a rejected application. 90% of users do not follow our instructions and their uploads get deleted and their applications rejected as a result. Repeated applications without following the guide will result in a banned account.
Read this guide carefully before you begin, then follow it step by step.
2. Prerequisites
You will need a few things in order to make your contribution:
- This guide - Read it in full before you begin
- The software that you want to contribute
- A scanner or camera able to take high quality pictures for the media, boxes, manuals etc.
- A floppy, CD or DVD drive (depending on the media you're using) to dump the contribution to the correct format
- Dumping software (we'll explain this in the guide)
- Time and patience
You should beforehand check that we do not already have what you're offering. You can check this by searching the database.
If we already have what you're offering but you have a better copy, or our copy is missing packaging/documentation etc. that you have, then we want this!
3. Accepted Software
The software that we're interested in doesn't just have to be pre-release software (commonly known as "betas" (despite the site name)), it can also be any software that has been released to the general public as "retail". It can be of any age and is not limited to only old software.
Software we accept (for archive access, these must be factory pressed original media):
- Retail and beta applications (any platform, any age)
- Retail and beta games (any platform, any age)
- Retail and beta operating systems (any platform, any age)
- Linux media (only by the distribution manufacturer)
- Developer media (MSDN, Technet, Apple Developer etc)
- Original OEM OS update media
- Evaluation software
Software we accept for general archiving (but will not get you archive access):
- Everything in the list above, plus
- Digital beta applications, games and operating systems
- Console beta games and applications
- Digital Microsoft MSDN, Technet and VLSC software
- Digital GOG (Good Old Games) games
- Original photo, artwork and clipart collection media
- Original font collection media
- Original press kit and promotional media
- Original demo computer software (limitations may apply, please ask on the forums or Discord)
Software we don't accept:
- Any third party copies of original media
- Any custom made media
- OEM recovery media
- Console retail games and applications
- Microsoft UUP compiled ISOs or downloaded sets
- Any Nintendo related software
- Digital open source software
- ROM sets (TOSEC, Nointro etc)
- Firmware and BIOS files
- Pre-installed virtual machines
- Harddrive or partition dumps
- Hardware driver media
- Freeware software
- Shareware software
- Console demo discs
- Source code
- Magazine and book media (courseware etc.)
- Digital mods or map packs
- Mobile software (Android, iOS etc.)
- Any software from mobile digital storefronts (Apple App Store, Google Play etc.)
If you have a title not matching the categories here that you think should be archived with us, please contact us!
4. Where to find software
Anywhere you like! Common places you can find software include:
- Thrift stores
- Attics
- Asking friends or family
- Garage sales
- Office clearances
- Auction websites
- Facebook marketplace
- Your work or school IT department
You will not necessarily be able to get software for free from every place you look, such as auction sites or garage sales, but these can often present themselves as easier options to get your first contribution.
5. Dumping the software
There are many pieces of software you can use to dump software. Below is a list of recommended tools.
To make sure you have the newest version check back on this page. If you want to read more about the tools original links to respective developer is also included. Remember that we are not always using the latest developer version as we don't upgrade often.
Note: A lone ISO file is not an acceptable dumping format. ISOs are only acceptable as a part of a DVD DIC dump. Any ISO files uploaded will not gain you archive access and will not be classed as original. Use one of the provided tools to properly dump your contribution.
Our recommended tools
We have guides for DiscImageCreator and Alcohol 120% below as these are our preferred dumping software.
List of dumping tools
-
DiscImageCreator: The primary archiving tool used for optical discs. It's open source and available on Github.
View Our Guide | Download (Preconfigured) | Download (Github) -
Alcohol 120%: The secondary archiving tool used for optical discs. Developed by Alcohol-Soft and it's a shareware tool. Best used when DiscImageCreator won't work with unsupported optical drives. We use a special free edition version of this tool.
View Our Guide | Download (Preconfigured) | Download (Developer Website) -
WinImage: A tool that will create raw images of a floppy. This is for Windows only, but as a replacement any other tool that creates raw floppy images can be used, such as raread, dd etc.
Download (Developer Website) -
KryoFlux: A tool that stores the magnetic flux values of a floppy, using a floppy drive. Requires a standalone controller purchased from the developers. The most preferred way to archive floppies as it creates the best copy of a floppy. It archives any format, any file system with any non-physical copy protection intact. Works with 3.5" floppies all the way to 8" floppies if you have the floppy drive. The tool uses its own proprietary flux format to save the data, but allows conversion to raw img, adf etc based on the source architecture.
Download (Developer Website) -
Smartversion: A tool that stores the differences between two source files. It is used to greatly reduce the total archive file size footprint if there is a set of files with similar contents, such as individual locale ISOs of the same product. The resulting "patch" can be restored to its original file contents without any modifications. Exists for multiple platforms, all included with our local copy as well as a quick batch file to restore all patch files to their original file sizes. Included with all our releases that are patched with this tool.
Download (Preconfigured) | Download (Developer Website) -
WinRAR: A trialware file archiver utility for Windows dating back to 1995. It is used to archive all our releases. Provides much better compression than regular zip while overcoming some of the limitations of the zip format. While WinRAR is for Windows only the developers provides binaries for other platforms to unpack RAR files.
Download (Developer Website) -
Parchive: An internal tool that creates parity files for our releases, used to restore any damage to our file sets. These parity files are not available to any of our users and only used internally as a first resort to repair any damaged archives. We use specifically the copy that comes with MultiPar which is available on Github.
Download (Developer Website)
Unsupported tools
We do not support use of the following tools as they do not correctly preserve data:
- UltraISO
- WinISO
- CloneCD
- CloneDVD
Important: We will never support tools such as UltraISO as they modify the contents of the raw image, nor will we support any other similar tool as we don't support custom made ISO files. We only provide ISO files as a last resort or if the developer distributes a digital copy of their software as an ISO file. We also don't support image formats such as BIN/CUE, CCD, NRG, CDI etc as they are either old and unsupported, or not good enough for our preservation purposes. Any disc images preserved into any of these formats will be automatically flagged as non-original and downloaded and will be tagged for immediate replacement. Try to re-image your optical discs using the supported tools listed in this glossary.
DiscImageCreator (DIC)
To dump a CD-ROM with DiscImageCreator you need a compatible drive, check the compatibility list at the DiscImageCreator GitHub page. DVD discs will work on all drives.
This guide is for Windows users only, but using the commands in the batch files it can be run on Linux as well. Check the GitHub page for a Linux version.
- Download the DiscImageCreator ZIP-file we've prepared. This is a pre-packaged version with batch-files to simplify the dumping process. Password for the archive is "BetaArchive".
- Unpack the ZIP-file to a folder.
-
Included are several batch-files:
- Dump CD.bat (works only with compatible drives, see the compatibility list at the DiscImageCreator GitHub page).
- Dump CD (Safedisc Protected).bat
- Dump CD (Securom Protected).bat
Included with the ZIP-file is a tool called ProtectionID which can help you identify what kind of copy protection your CD-ROM has. This tool only applies to CD-ROMs and can be ignored if you're dumping a DVD-ROM.
- Run the appropriate batch file, enter the drive letter (ex. H) for your drive and wait until the dumping finishes. Follow all the instructions and be sure there are no errors reported.
- Pack up the entire media_dic folder and upload to BetaArchive according to our upload guidelines.
Alcohol 120%
This guide is for Windows users only.
Important: If you're dumping a DVD disc please use DiscImageCreator instead.
------
- Download our portable version of Alcohol120% Free Edition. This is a freeware version which has the capabilities needed for a proper dump. Unpack it to a folder of your choice.
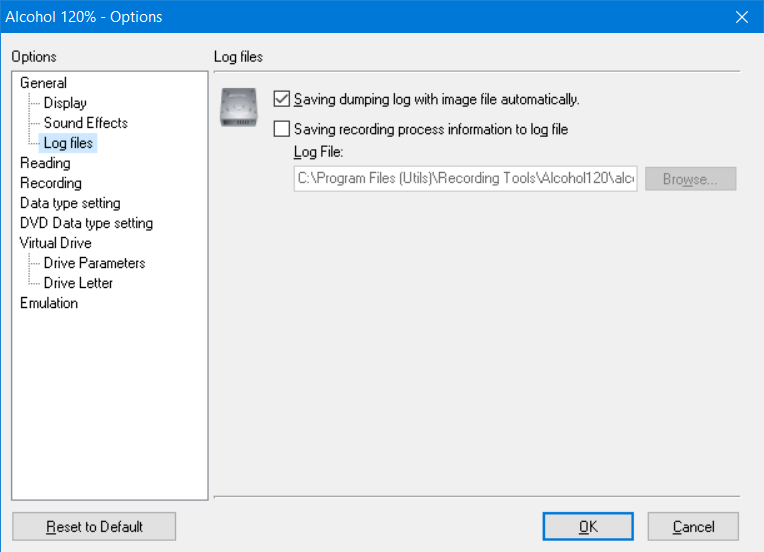
- To quickly enable the required logging settings double-click the registry file called "EnableLogging.reg" to import the logging settings into your system. This will enable the dump log that goes with the disc dump, and also disable the Alcohol 120% general logging for privacy concerns. You can also enable these options within the application in "View" > "Options" > "Log files".
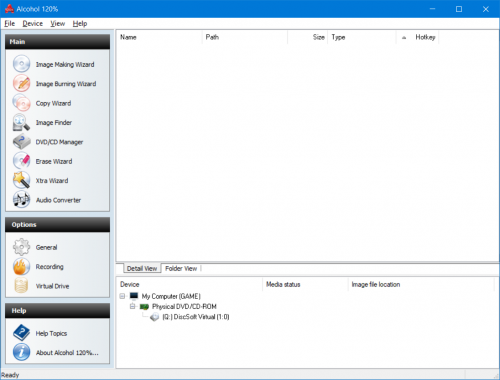
- Start the application by running "Alcohol.exe". Ignore the error that pops up since we don't need virtual drives.
-
Once it's loaded up it will look like this:
-
If you need to verify that the logging option is enabled go to "View" > "Options" > "Log files":

-
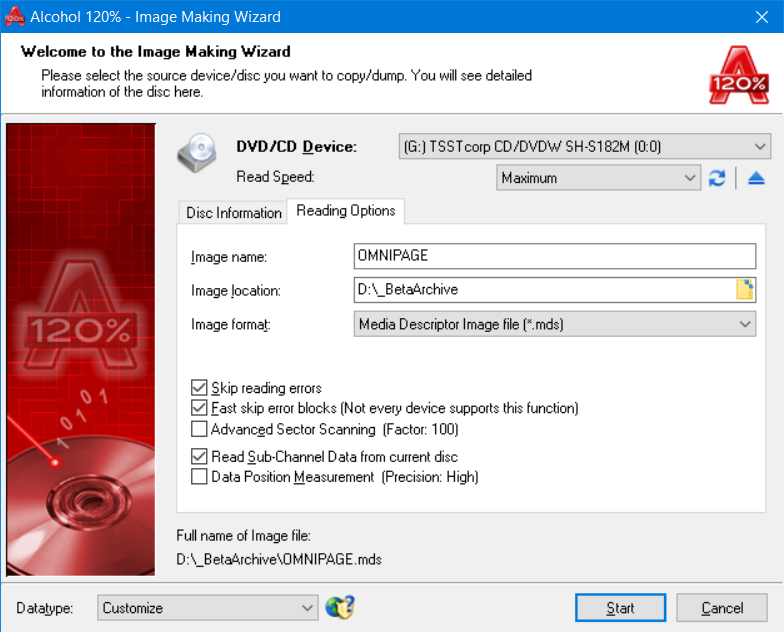
Click on the top left option saying "Image Making Wizard". A new window will popup. At the bottom pulldown bar named "Datatype" select "General Protected CD". This will enable most options needed.

-
If you choose a different datatype profile be sure to have the following options checked: [X] Read Sub-Channel Data from current disc, [X]Skip reading errors. Be sure "Image format" is set to "Media Descriptor Image file (*.mds)".
Please note that not all options will be available when dumping a DVD-ROM.
Once all options are verified press [Start] to initiate the reading of the disc. -
Alcohol 120% will start dumping the disc, this may take a while depending on the size of the disc, speed of your drive and condition of the disc.
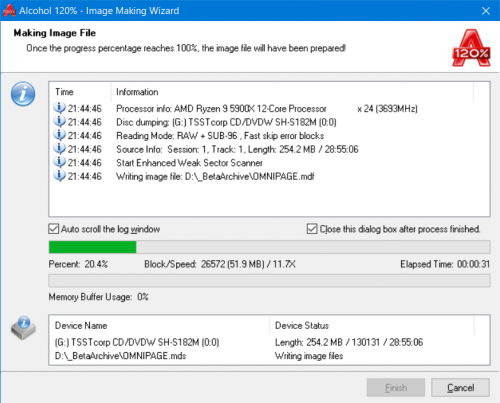
If you get reading errors go back to step 5 and also enable the checkbox called "Data Position Measurement". This will increase the dumping time significantly but will pre-analyze the disc for any mastering errors before the dump. Keep this always enabled if you can spare the time. -
Once the reading is finished you will be presented with three files: one .MDS, one .MDF file and one .LOG file. This is a complete dump of your disc.

The log file will contain the full dump log of the session. Make sure these three files for each dumped disc are included. All files must be included with your upload!


If you intend to upload this to BetaArchive be sure to pack all files (three per disc) in a single archive (rar, 7z) with any additional material you wish to add (scanned artwork etc) and upload it. For safety be sure to add a recovery record to the archive in case the upload fails in some manner. If needed you can split the archive into several parts or pack up each disc in a separate archive.
Be sure to check the scanning guide as well as abandonware guide for proper preservation.
6. Scanning media, artwork and documentation
With your release you need to provide properly made scans of the media, box/cover art and documentation and save it into an unaltered and acceptable file format.
This step of the preservation process is not optional!
This guide is a general one fit for all operating systems and platforms. To prevent issues do not to use the manufacturer supplied OEM scanner software, use the software provided by your operating system such as Windows Fax and Scan for Windows or Printers & Scanners in macOS. Third party tools such as VueScan are also recommended.
------
The general rule is to scan everything you can. Media, booklets, pamphlets, covers etc. If you don't want to scan an entire booklet scan only the front and back covers. Scan all sides of any boxes.
Preparations:
- Clean all surfaces.
- Clean your scanner glass surface.
- Take out any paper covers from their plastic enclosures, and flatten them out completely.
Scanning procedures:
-
Put the item the scanner. Make sure it's properly aligned. This goes for any manuals, box covers etc too.


It does not need to be 100% aligned as above, but as closely as possible. None of the scans should need to be rotated in post-processing (do not edit the scans before uploading!)
Make sure there's plenty of empty area around the scanned objects, especially if you scan multiple items at the same time. No edges are to be cut off, all of the surfaces must be visible in the scan.
- When you scan a disc scan also the inner ring located on the data side of the disc. In this case it's not necessary to scan the entire disc surface. Make sure all numbers are readable.
- Scan the items at 600dpi or higher.
- Scans must be done in full color. Grayscale scans are not acceptable even if the material is black and white.
- Do not do any post-processing on the scan afterwards. No rotation, adjusting of colors etc.
- Do not scan any covers or enclosures with any media in them.
- Save the scan as a PNG-file or TIF-file. Label the scan properly, like Disc01.png and so on.
- Review your results and make sure everything looks good, that no areas are cropped or blurred.
Converting jpeg scans to png or tif will not be acceptable! Make sure your software saves to a lossless format directly!
If you don't follow these guidelines there's no guarantee that I will process your scans and your time scanning your media and covers will be wasted. Do it right from the start and it will be approved.
------
If you do not own a scanner you need to take reference pictures with a digital camera or good cellphone. To make these pictures acceptable you need to follow all the above guidelines with these additional instructions:
- Use the highest resolution of the camera.
- Use a clean white background, printer paper is recommended.
- Use proper light such as daylight or white light. Make sure there are no reflections or glare.
- Review your result! Make sure your photos are not blurry, smudgy or in any way bad quality wise.
7. Properly naming your upload
To make it easier to name your uploads you will have to help by providing the most information about your release as possible. To do this you need to name your archived releases with the proper filename.
To best illustrate it, here's an example:
Microsoft Excel 4.0a (''Crunchy'' 4.00.1234) (1992-09-29) (3.5''-1.44MB) (beta) [English] [DEC OEM].rar
To break it down:
- Microsoft Excel 4.0a: The full product name with official version number. Required.
- (''Crunchy'' 4.00.1234): Codename followed by full and expanded version number. For abandonware titles the codename can be omitted. Expanded version number is optional if available.
- (1992-09-29): The date of the titles release. This is not the same as original release of the product, but the release date of this actual title. Many products gets re-releases and updates so it's important to tag it with the proper date. Year is required, month-day is optional if available.
- (3.5''-1.44MB): The media the title was released on followed by the size of the media. Use "-DMF" for Microsoft DMF floppy formats. Required for floppies, optional for other media.
- (beta): Development stage of the title, only used for beta titles. Required only for non-abandonware titles.
- [English]: Main language of the title. If multiple languages are included list them in an included readme file and label this as [Multilanguage]. Required.
- [DEC OEM] Optional tags. If there are any additional info that needs to be included, like the OEM vendor in the example, add it within brackets. Optional.
As always you can add any additional information such as details, installation instructions, notices etc. in a separate readme file. Any special instructions to install or use the title will be included with the release in a separate text file. The more info you provide the better.
Any uploaded releases that doesn't follow this naming convention will take longer to process and even be discarded as I have no time to identify the release for you. You provided the release, you know most about it so you need to label it properly.
8. Preparing your upload
Each release must be compressed into an archive.
Acceptable formats:
- RAR
- 7z
- ZIP
Single archive or split archive is fine depending on size and stability of your connection.
If possible, use an archive recovery option or include a par2-set with the release in case the upload goes bad.
You will be unable to upload your file to our FTP server if you do not compress it into an archive.
9. Uploading your file
When you have completed all of the previous steps in this guide then you are ready to upload your files.
This is what you need to know before you begin this process:
- You will need to connect to the provided FTP server to start the upload process (details provided after you click the button below). You will need an FTP client and knowledge of how to upload files to an FTP folder.
- Create a folder named using your forum username and upload all files to this folder.
Note: Failure to upload to a folder named using your forum username will be treated as an anonymous upload and you will not have the upload associated with your account. This cannot be rectified later as we will have no record of who uploaded it! - You will not be able to rename or delete anything you upload. If you make any mistakes, upload a blank file or folder with the name stating what has happened, then create a new folder to upload into and begin again.
- When your upload is finished, add a file or folder called "Completed" so that we know it is ready.
10. Applying for archive access
If you've made it this far then you're almost ready to apply.
Before you continue, run through this checklist to ensure that you have completed all of the necessary steps:
- Check that your software is on the acceptable software list.
- Your contribution is dumped correctly using one of the provided tools.
- Your media (artwork, documentation, etc) is scanned properly and follows our guidelines.
- Your contribution is properly named according to our guidelines.
- Your contribution is packed into the correct format.
- Your files have been fully uploaded to our FTP server. Don't apply until your uploads are finished.
If you have done this, then you're ready to proceed with your application.
If you have not completed these then you should go back and complete them before you apply. Failure to do so will lead to rejection of your application.
To complete your application, apply to the Archive Access group on the forum. This will tell our archive administrator that your file is ready for processing.
On the next page, you will need to select the "Archive Access" group as shown below, and then submit the form.


Click the link in the box below to continue.
11. Wait for your file and application to be processed
If you have followed the process properly, your files should be processed within 7 days by our archive admin 'mrpijey', but sometimes it may take longer (our admins are human too!).
If you have heard nothing after 7 days, you can get in touch on discord or via the forum for an update.
If you did not follow the guidelines properly, we may simply remove your application and your files without warning or notification, and no further processing will occur. Your application will simply disappear. 90% of people do not follow the guidelines and waste our time, so do not be one of those people. Repeated attempts to gain access without following the guidelines will result in a forum ban.
Once I get access, what do I get?
- Access to more than 100TB of archived betas and abandonware.
- Up to 75Mbps* download speeds, SSL encrypted.
- 50GB/day download quota**.
- Your name will turn red!
* Subject to routing, latency and network conditions.
** Fair usage applies.
Can I donate to get access?
No. We do not accept any donation amount to get archive access.
If you already donated in the hope of achieving this, we're sorry to disappoint. Donations are not refundable.
Are there any rules I should be aware of?
Yes, we have a few.
The following will result in loss of Archive Access group membership:
- Leaking or sharing of your site login details with anyone (including other members).
- Excessive bandwidth usage despite warnings to reduce it.
- Constant server hammering despite warnings.
- Breaking any of the other regular forum rules.
If you lose your Archive Access group membership you will never be able to get it back.
I have applied for Archive Access but I don't have access yet. Why?
All applications are manually reviewed by our archive administrator, mrpijey. Application processing can take up to 7 days so you must be patient. It takes time to verify and process your upload.
Your application will remain as pending whilst your application is processing. To check the status of your application, go to your User Control Panel (UCP) and check the status of Archive Access. If it's back to "Non-memberships" (and not "Pending"), then your application was unsuccessful.
My application disappeared. Why?
If you clearly fail to follow the contribution guide set out above then your application will simply get removed along with your files. We do not have time for time wasters. Follow the guidelines properly and re-apply. If you continue to re-apply without doing so your account will be banned.
My application was rejected. Why?
If you made a reasonable effort to follow the guidelines, as in it was clear that you have attempted to follow our instructions, a reason will be PM'ed to you on the forum.
If it was clear you did not make an effort to follow our instructions, we will simply delete your upload and application without notification. If you continue to make no effort you will eventually receive a ban from the site. Ignoring our instructions is a waste of your time and our time.
I keep getting rejected, why won't you accept my files?
If you keep getting rejected it is because you did not follow the guidelines or your file is not accepted under our guidelines.
Review the guidelines again and if you have any questions you can ask them on the forum or on discord.
I'm still confused, can you help me?
Drop us a message on discord or on the forum and someone will help you.