Tutorial: RTC replacement on older motherboards 8086 to 486

Any off topic discussions should go in this forum. Post count is not increased by posting here.
Archive Access status is required to post in this forum. Find out how to get it
Forum rules
Any off topic discussions should go in this forum. Post count is not increased by posting here.
Archive Access status is required to post in this forum. Find out how to get it
Post Reply
blackrider1
Posts: 22
Joined: Tue Sep 06, 2011 11:47 pm

Tutorial: RTC replacement on older motherboards 8086 to 486

Post by blackrider1 »

BIOS BATTERY LOCATION,REPLACEMENT AND MODDING IN OLDER MOTHERBOARDS (Pentium, 486, 386 ...)

Motherboard of a computer usually has an small cell or battery that keeps powered the BIOS chip, which stores the configuration parameters of our machines, the time and date.
Throughout the years, such a cell or battery, has been evolved making possible to find several types of them, such as:

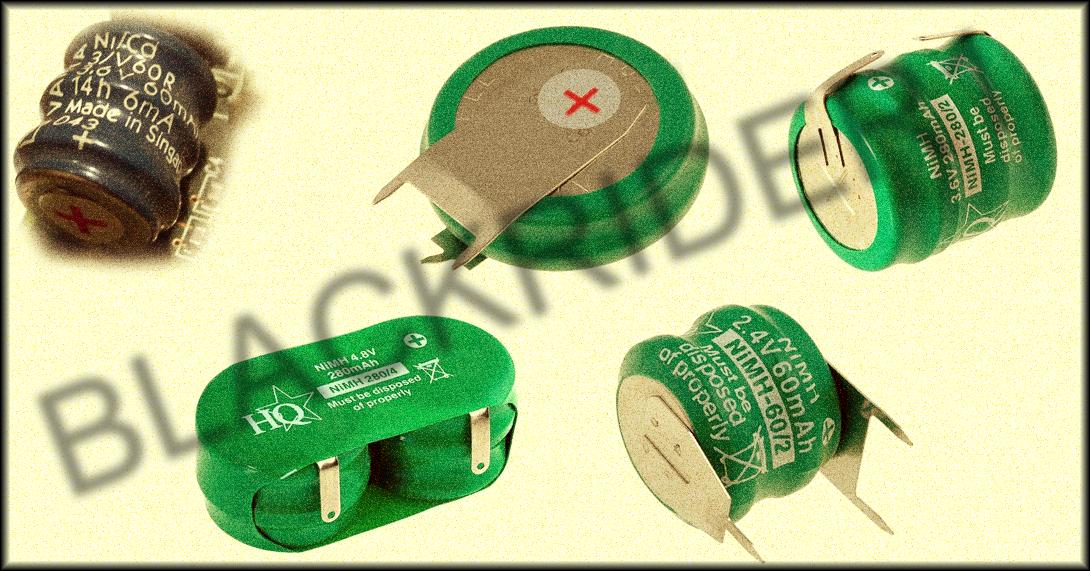
1. Nickel / Cadmium Ni-Cd Batteries, Nickel Metal Hydride Ni-MH, especially onto the older motherboards from 8086 to some 486 microprocessors and Pentiums
Image
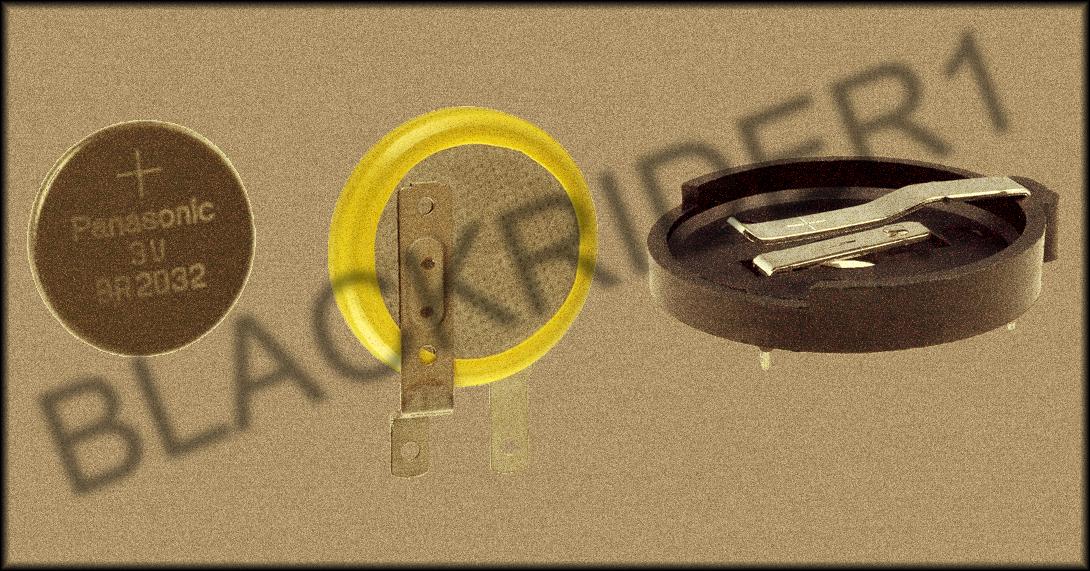
2. Lithium battery, commonly known as button cell, usually placed on a socket (one), or several grouped and soldered on the motherboard.
These batteries are classified by size according to a numbering. Actually, the most widespread is CR2032, 3.0 v.
Image
These batteries can be rechargables (so,you do not need replacing them, although if the PC hasn´t been running for too long, they may need some time to re-take the minimum load that causes the PC to boot) or non rechargables, which are the most usual.
When we have a dead battery (no charge on it), can be the case that the PC will not boot, or if it does, you get the time, date or any settings in the BIOS changed.
In this case, it should be replaced as soon as possible to avoid misconfigurations in the BIOS or not to start the PC.
The Ni / Cd and NI / MH battery, may even leaks acid on the motherboard on which is soldered, if not used for long time. Its replacement way is to unsolder it, clean the residual liquid (if any), and solder a new one.
The batteries that go into a socket, are easier to replace.
However, in motherboards of the first Pentiums, 486´s and older ones, this battery comes in a encapsulated package, something that makes it hard to locate, as this package is often confused with one of the many chips of the motherboard
Image
These encapsulated (RTC,Real Time Clock) are usually composed of a chip, a quartz and a lithium cell or battery and can be different: soldered to the motherboard or inserted into sockets
Replacing the RTC (Real Time Clock) can be a problem, if soldered to the motherboard, as we need to unsolder it. If inserted into a socket, is easy to replace it, removing it carefully and replacing with one of the same type or compatible.
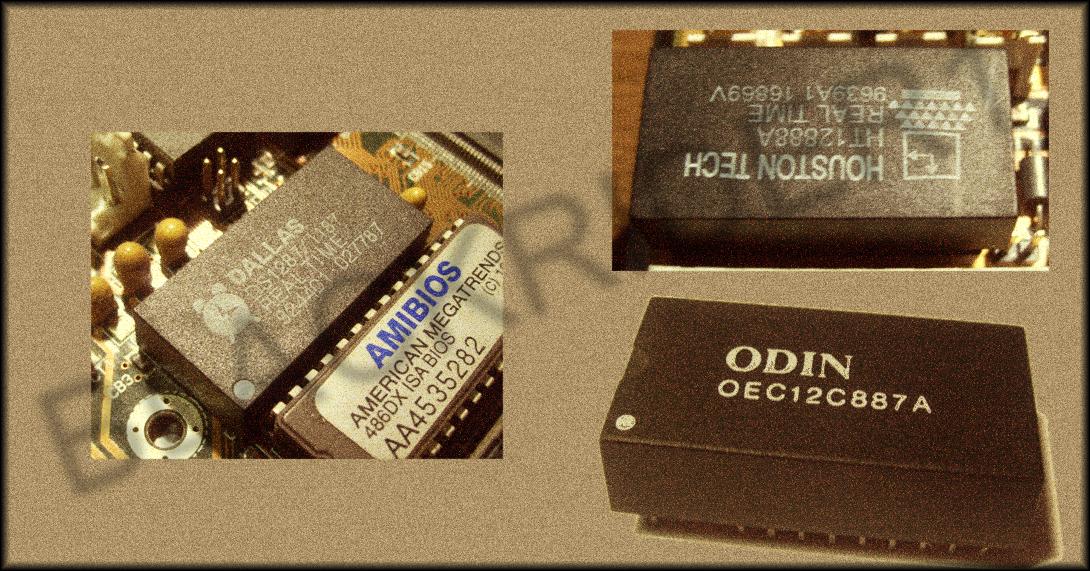
The problem comes in finding these encapsulated actually. Years ago, there were several manufacturers of these RTC:
Dallas, Houston Tech, Benchmarq, Odin and ST, although nowdays, I think the only one that still makes them is Dallas.
The most common models of RTC (also known as NVRAM) of some of these manufacturers are or were:
-DS12887A Dallas (which is compatible with models ODIN and ST below this lines),
-Tech Houston using the same nomenclature as Dallas
-Benchmarq BQ3287, compatible with the Dallas DS12887
-Odin OEC12C887A
-ST M48T86
Replacement in these situations is to find a compatible model and change it, taking care of the position of the pins (Pin 1 is usually marked as a small circle or an small chamfer close to it). Normally, this RTCs (Dallas and ODIN) are pin compatibles (within same models, of course) so I think this is the correct pinout for this chips:
Image
Generally, these chips are available online with an estimated retail price of around 13 euros (16 dollars plus shipping). However, there is another way to fix our old pcs, when this battery is dead.
As I said before, a RTC consists of a chip, a crystal and a lithium battery. Generally, this battery is connected between pins 16 and 20 of the IC so, once located the battery, you can desolder it, put a new equivalent one, and your pc will work again.

EXAMPLES:


NOT SOLID RTC
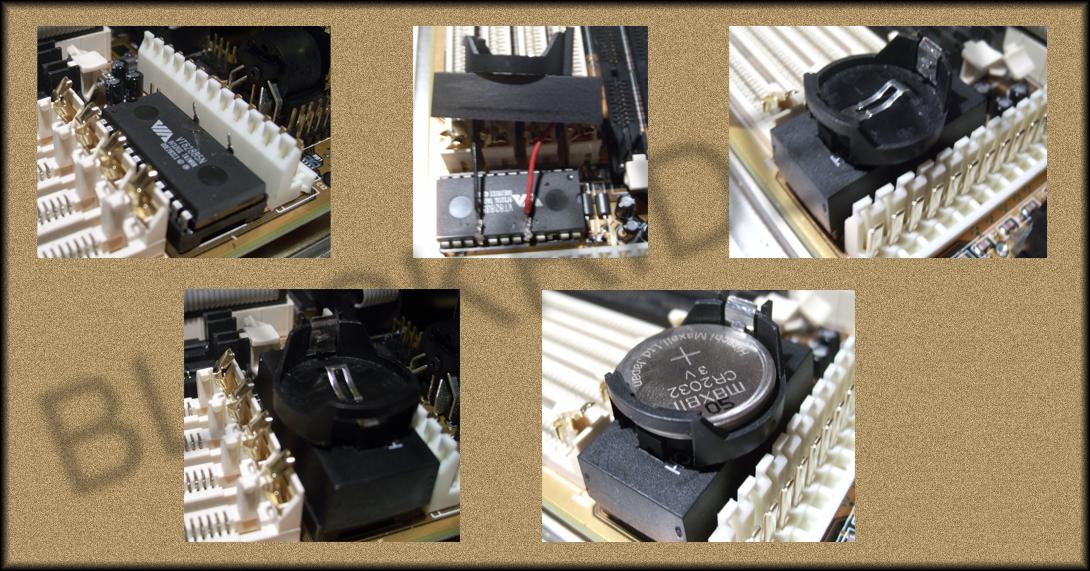
If the RTC has a lid, that is not solid, you can simply lift the lid up, so the cell will be accessible for changing, as happened with this mobo of a 486.
If we have a Houston Tech RTC, it´s really simply modding it, just pull the lid up and you´ll see the battery exposed . Just unsolder the old battery and replace it with a new one
However, although in this case would have been more advisable to desolder and replace this battery with a new one, I took a little imagination and added a CR2032 socket, so, in the future,replacement will be much easier.
On the top of the RTC plastic lid I made two holes for the pins of the new socket with a cutter and carefully, I glued the socket on the lid and soldered two wires (+ and -), in that way:

a)Working on the plastic lid:

Image

b)Working on the RTC:
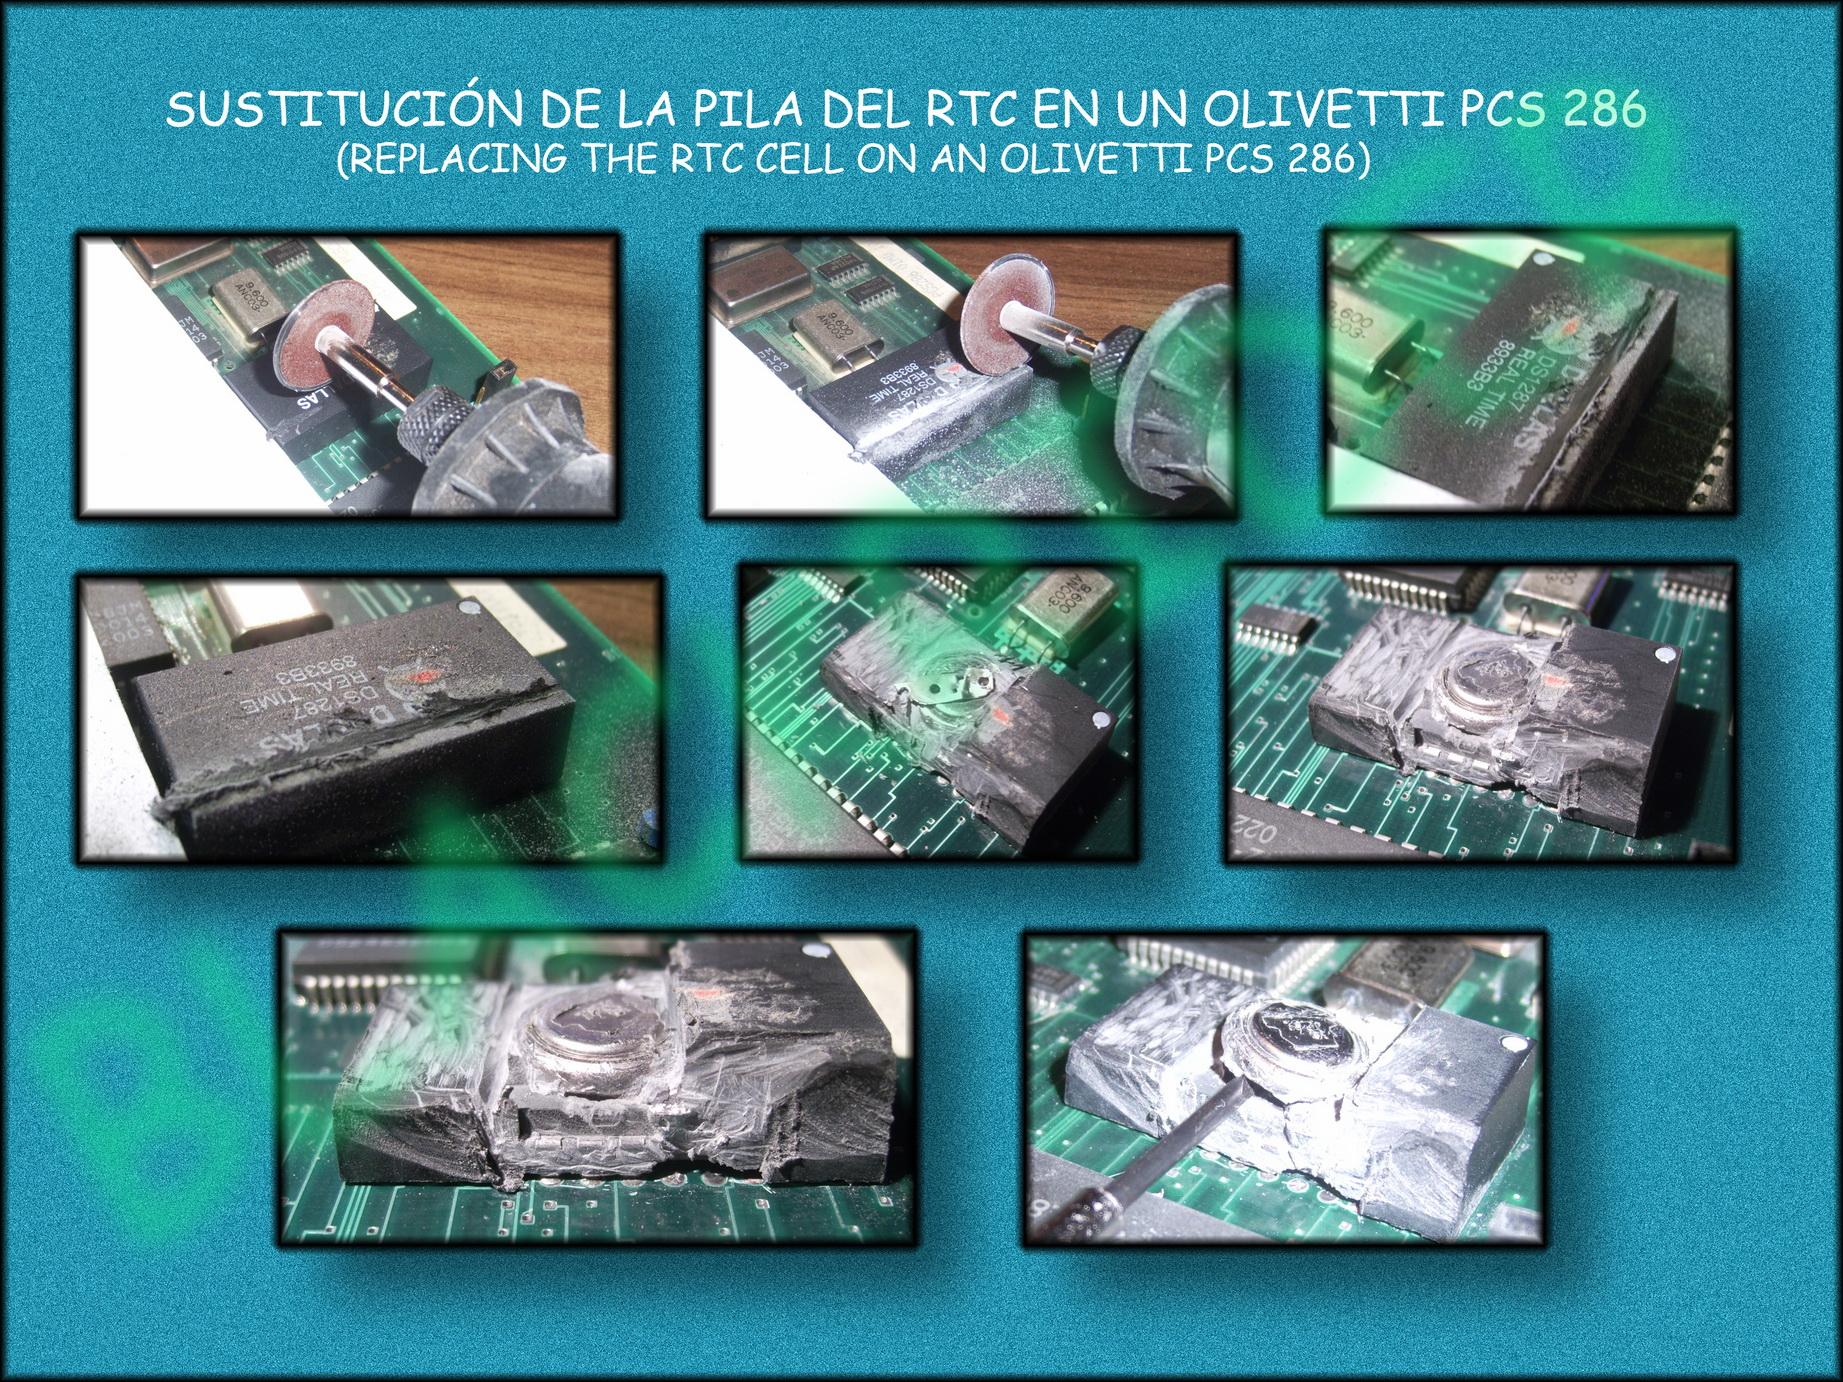
Image

SOLID RTC

If the RTC (NVRAM) is solid, I mean, you can not take apart the top of the chip, the only way to remove the top is, for example, with a mini Dremel, taking care of the height at which we will make the cut to avoid damaging the chip (usually you can see an small chamfer that makes the box not to be totally square so, cutting above the notch, there should be no major problem). Also we need to take care of the depth of cut near 16 and 20 pins, and near 1-2 and 23-24, as they tend to be bent upward to be soldered to the battery and the quartz, as we could cut them.
Afterward, with a flat screwdriver slowly remove the top (in my case, the top cover left easily, not the part surrounding the cell) to to see the battery.

Image

As we can see in this case, the pin 16 (-) go inside the resin to
hollow core of the cell, while the pin 20 (+) is soldered to a metal contact. Carefully lift the metal contact up and took the battery out with a small flat screwdriver (in this case it is a CR1220 battery) replacing the new one.
Once the old battery was replaced, just use some fixig tape to hold the positive metal contact to the RTC and reassemble the whole chip in its socket on the motherboard

Image
Image


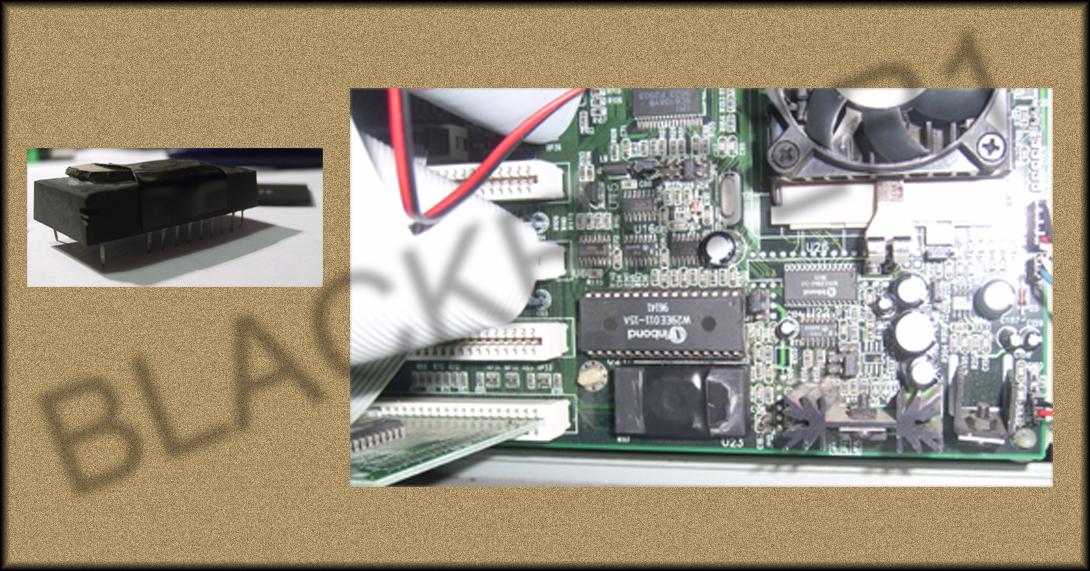
I found this type of RTC on an Pentium 166 motherboard ( EXP8661) and the RTC, in this case, was a OEC12C887A ODIN, whose replacement, if nedded, would be the Dallas DS12887A.
By the way, it seems that the “A” character at the end of the name, refers to those that are erase-password protected and can not be manipulated by normal users, while those who do not have the “A”, can be completely deleted by any user without a password .

Well, I hope this post is usefull for you and help on locating and replacing the battery on an old mobos.
Thanks ( And sorry if I made a mistake with my English).

linuxlove
Donator
Posts: 5901
Joined: Tue Dec 01, 2009 2:56 am

Re: Tutorial: RTC replacement on older motherboards 8086 to

Post by linuxlove »

blackrider1 wrote:Thanks ( And sorry if I made a mistake with my English).
Actually, your English is far better than some users here, even some who live in an English speaking country.
Goodbye.

blackrider1
Posts: 22
Joined: Tue Sep 06, 2011 11:47 pm

Re: Tutorial: RTC replacement on older motherboards 8086 to

Post by blackrider1 »

Thanks linuxlove, I´ve just translated this manual, because I wrote it in Spanish. As you can see, I like vintage pcs, the best ones to test every version of OSES you have here.
Thanks again.

Green70
Posts: 3
Joined: Sun Sep 25, 2011 2:03 am

Re: Tutorial: RTC replacement on older motherboards 8086 to

Post by Green70 »

Hello,

Thanks blackrider1 for the informative text and images explaining the ODIN RTC battery replacement. You inspired me to give it a try.

This was a circa 1995 PC with MB-8500-TUC-A motherboard and RTC is ODIN OEC12C887A.

The PC booted fine last time I booted it about 3 weeks ago. Yesterday though, on boot up there was the "CMOS battery low" warning. Even if I re-entered time date and setup specs into CMOS, and rebooted without turning off power, on reboot the process stopped with "CMOS battery low".

Following blackrider1's excellent directions, and with some of my equipment (milling machine) I was able to easily take the top of the epoxy-filled ODIN off while still attached to the motherboard (soldered connection mounting of the ODIN). I removed the battery, inserted a new one and rigged up a non-conductive hold-down to insure the battery contact plate securely held the battery in position for a solid electrical connection.

Now when I boot the PC with everything re-installed, sometimes nothing happens-- the boot process does not even begin. On other attempts though, the PC cycles in an endless loop of: Video details appear on screen, then message "NVRAM booting..... Update OK!" Then a message of "Hit delete key to enter setup." But then, immediately, even if I stab the delete key, the monitor screen goes blank and the boot process starts over. It loops through this cycle for as long as I leave the power on.

I'm considering buying a new Dallas DS12887A RTC, but now I am not sure if that will help. After all the ODIN was working fine up until the "CMOS battery low" warning.

Does anyone have any thoughts on what might be causing the bootup loop cycling? I hate to have to stop using this PC. Even though I only use it 2 or 3 times per year, it does serve a good purpose.

Thanks again blackrider1.

blackrider1
Posts: 22
Joined: Tue Sep 06, 2011 11:47 pm

Re: Tutorial: RTC replacement on older motherboards 8086 to

Post by blackrider1 »

Hi Green70, I´m glad you used this mini tutorial to fix your ODIN RTC.
Are you sure that you hasn´t cut any pin while removing the epoxy?
To do that, did you remove any card,HD...?
I guess you´ve checked every card back on the motherboard and the repalcement battery (same model and charge).
Be in mind that, when you remove the battery, you´re lossing every configuration about HDDs,devices....)
In some cases, I had to wait for a while to get the RTC charged again,when replaced the cell. Try this.
And try to clear CMOS instead:

http://stason.org/TULARC/pc/motherboard ... u-199.html

I don´t know what else to try if this doesn´t work.
Hope you´ll fix it.
Thanks
Last edited by blackrider1 on Mon Sep 26, 2011 8:49 pm, edited 3 times in total.

blackrider1
Posts: 22
Joined: Tue Sep 06, 2011 11:47 pm

Re: Tutorial: RTC replacement on older motherboards 8086 to

Post by blackrider1 »

Take a look at this. This is a mod I made on an Olivetti PCS286 board with a Dallas DS1287. Curiously,as you can see, once the epoxy was removed, it is a Dallas DS1285.
I broke the negative plate of the cell, so I soldered two wires to the plates, pass them trough 2 holes on the motherboard and put a 2032 socket at the end of the wires:

Image

Image

Image

PD:This old motherboard reminds me of Matrix screen saver :D
Last edited by blackrider1 on Mon Sep 26, 2011 6:37 pm, edited 1 time in total.

GL1zdA
User avatar
Posts: 515
Joined: Thu Dec 03, 2009 3:32 pm
Location: Warsaw, PL

Re: Tutorial: RTC replacement on older motherboards 8086 to

Post by GL1zdA »

Good stuff. I hate these chips, though the barrel battery is even worse when it leaks.
Image

Green70
Posts: 3
Joined: Sun Sep 25, 2011 2:03 am

Re: Tutorial: RTC replacement on older motherboards 8086 to

Post by Green70 »

I did discover the battery was not making consistent electrical connection to the negative contact plate under the battery. This because the epoxy contour created by the old battery prevented the new battery from making full contact. I resolved this problem and now at least I do not ever get a completely blank screen on bootup. Every time I boot the PC it does go through the endless loop cycle I described before.

>>>Are you sure that you hasn´t cut any pin while removing the epoxy?

Yes, certain. I removed only about 0.50 mm of surface per pass of cutting bit. Made many thin passes instead of a few thick ones. Did not cut into any pins.

>>>To do that, did you remove any card,HD...?

Yes. Removed all cards and drives-- in fact removed MB from case to work on the RTC

>>>I guess you´ve checked every card back on the motherboard and the replacement battery (same model and charge).

Yes, I tried to boot with everything installed back like before. Also tried booting with all cards and drives removed. New battery is same as old CR1220.

>>>In some cases, I had to wait for a while to get the RTC charged again,when replaced the cell. Try this.

Glad you mentioned this. I did not do this at first, but now I have had the new battery installed and left in place since yesterday so I'm sure this is not the problem.

>>>And try to clear CMOS instead:

Yes. With new battery in RTC, I cleared CMOS by closing CMOS jumper on MB

>>>I don´t know what else to try if this doesn´t work.

Thanks for all the suggestions.

>>>Hope you´ll fix it.

I think I will buy a PC Post Card Tester to see if it shows any possible trouble areas.

blackrider1
Posts: 22
Joined: Tue Sep 06, 2011 11:47 pm

Re: Tutorial: RTC replacement on older motherboards 8086 to

Post by blackrider1 »

I think your mobo is a BIOSTAR...why don´t you try flashing the bios again, maybe it solves your problem:

ftp://ftp.biostar-usa.com/bios/8500TUC/
http://www.drivermuseum.com/files/drivers/bios_d.html

(the readme.txt has how to update the bios, you can do it without waitting for post messages).


Other interesting links about your motherboard (if Biostar, of course):

http://rk86.com/th99/m/txt/33499.txt
ftp://ftp.biostar-usa.com/manuals/
http://www.rebelshavenforum.com/sis-bin ... 4;t=000069

Thanks

Green70
Posts: 3
Joined: Sun Sep 25, 2011 2:03 am

Re: Tutorial: RTC replacement on older motherboards 8086 to

Post by Green70 »

Yes it is Biostar.

I just attempted to flash the BIOS. The process would start, but the PC would not reboot itself in order to complete the process. Don't know why but the PC will not reboot by pushing the reset button or CTRL ALT DEL either. Only way to reboot is to turn power off and restart.

My Post Card Tester is on order and should be here in a few days.

z180
Donator
Posts: 982
Joined: Sat Aug 21, 2010 5:10 pm
Location: In front of my Toughbook

Re: Tutorial: RTC replacement on older motherboards 8086 to

Post by z180 »

Your tutorial may rescue some old PCs of unexperienced owners for old software.
It could have been posted in the tutorials and guides forum.
Stephen Elop….I curse you, that after your death your soul will be forever trapped in the sourcecode of Windows and one day Microsoft will fall because of that virus code!

blackrider1
Posts: 22
Joined: Tue Sep 06, 2011 11:47 pm

Re: Tutorial: RTC replacement on older motherboards 8086 to

Post by blackrider1 »

z180: This is related about a hardware modifications and repair. The tutorial section, as it is said :"Tutorials for Operating Systems, Applications etc can be posted here...", has a lot of diferentes themes, specially software and apps related themes, so I thought it´d fits better here.
Could it be posible a hardware repair section in the tutorials and guides thread or even an index? It could be great, I have a couple of tutorials about hardware repair in proccess and wouldn´t like them to get lost between a lot of software and apps tutorials. Don´t be offended but I think they should be separatted, here or in the tutorials & guides thread /hardware repair new section. What do you think?Could it be possible?

GREEN70: Have you checked memory modules, power supply, PS/2 or MiniDIN I/O and frontal pannel connectors?

Post Reply